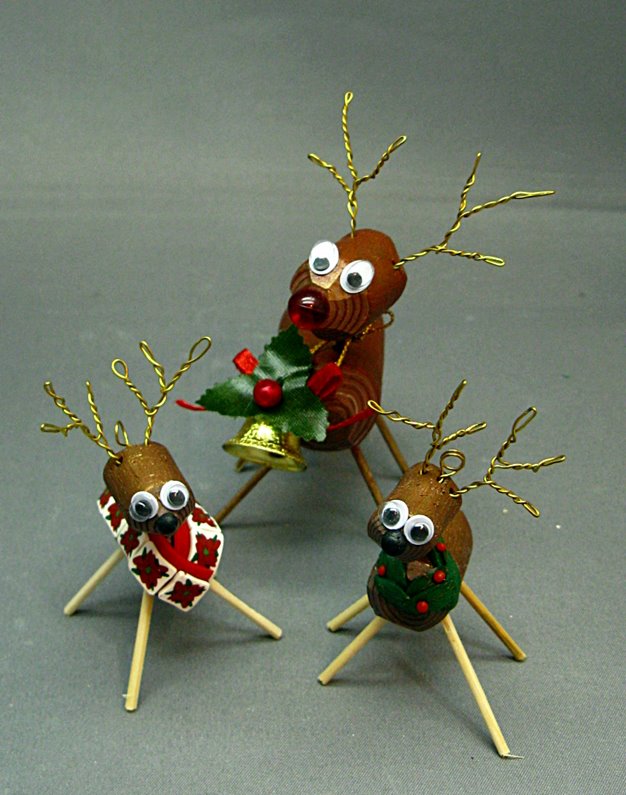
Thursday, December 22, 2011

...And to All a Good Night...


Hi All,

Created this piece this morning.  It's about 2 inches tall, and 3 inches wide.  It's going to a friend and I know it's going to be a surprise for them.  It's got a hole drilled in the back and through the top so you can't see the hole from the front, but yet it can be hung like an ornament.

The leaf cane works very well with it.  The background is some of the bits that I had left over that I was mixing together and fortunately stopped at the right moment.

It seems so peaceful and I'm very pleased with it.  

Merry Christmas to All, and to All a Good Night.

Sandy


Monday, December 19, 2011

Six snowflakes


Hi Everyone,

I subscribe to Polymer Clay Smooshers on Facebook and always enjoy what they highlight. A few weeks ago I saw some ornaments made by Kael Mijoy and I knew I had found my inspiration for my Christmas ornaments, particularly once I saw this one.  So off I went to make snowflake ornaments.

Actually, first I tried one of her tutorials on making a beautiful flower cane which looked simple enough.  Since I hadn't done any caning in a while, I thought it would be a great start to getting back into caning.  Surprisingly, I had a difficult time (through no fault of Kael's) and gave up with that cane and went my own way once it became apparent that it wasn't going to work for me. 

But, it turned out to be a great snowflake cane as you can see in the detail below.  I also loved her leaf canes and decided to make one of my own.  I think this leaf cane is one of my all time favourite canes that I've ever made.


Anyhow, thanks so much to Kael for helping me (though she doesn't know it yet) create a series of ornaments that have been very well received by family and a family friend..

 This is likely my last posting of the year, so Merry Christmas, Happy New Year,  Season's Greetings, or however you call the finish of 2011 to everyone.  May 2012 start off with magic and continue to get better.


Cheers,

Sandy

Wednesday, December 7, 2011

Simple Santas


Hi Everyone,

Here are a couple of ornaments that I've made for one of my nieces and her best friend.  They're rooming together as they attend university (so far so good and they're still best friends) and I wanted to make them something flat that was easy to ship.

I'm happy with them and I think they will be, too.

Cheers,

Sandy

Saturday, December 3, 2011

A trio of tiles

Hi Everyone,

As I mentioned previously, Wendy of the famed Cabezels gave me a Cabezel prototype that she wasn't particularly happy with.  I promised that I'd post my journeys in experimentation with it.

I love it!

I think it's a great opportunity to keep things grouped within a bit of a theme.

Here's my first Christmas trio.  There definitely was some experimentation going on and I really like the potential variety in the frame that can be done.

The one on the right I've decided to give to someone who has been particularly kind but I've never met in person.  I hope she likes it.  The other two I'm not sure about yet.  The one in the middle (starting to sound like a Johnny Cash song) is OK, but a bit plain and the one on the left is too busy and I don't like how the lettering on the outside frame isn't perfect.  But I do love the colours and the theme.


Anyhow, I do have two other themes that I'm working on and I'll post those later.

Cheers,

Sandy

Wednesday, November 30, 2011

My New Favourite Food Website

Hi Everyone, 

I discovered foodgawker.com through my friend Diane Boivin yesterday.  I hadn't spoken with Diane in a while but e-mailed her to let her know that I was impressed that she was famous because she was mentioned on Polymer Clay Daily here.  That started up a conversation, in which she agreed to continue to talk to me since I had also been mentioned on Polymer Clay Daily.

She asked if I were a member of Pinterest.

I'd never heard of Pinterest but signed up because it looked interesting.  I spent a few happy moments browsing Diane's Pinterest site until I discovered foodgawker.  And then I lost a couple of hours as I scanned through the the selections.  I became a foodgawker addict and posted several recipes to friends' Facebook walls that I thought would appeal to them.  I've also forwarded on the link to several friends here at work and sighs of pleasure can be heard from the cubicles.

I'm not sure on the protocol on posting pictures from foodgawker so I'll leave it to you to explore.  It's definitely worth a visit.

Here's the link - http://foodgawker.com/.

Enjoy.  I sure am.

Sandy


Tuesday, November 29, 2011

Rudolph had babies...


Hi Everyone,

I taught a somewhat (we had a very small meeting) successful class at Guild and while prepping for the class I decided to make smaller reindeer. Essentially it's the same formula as the tutorial I posted earlier here, except that the jelly roll log makes two reindeer.  Use less wire for the antlers and that's the only real difference in technique.

I can't seem to find the oval googly eyes in the stores, but haven't really looked too hard.  One tweak to the tutorial above is that you may want to make an indent for the eyes before baking, particularly for the smaller ones.  Otherwise they might end up a bit skewed looking.  But that can be part of the charm, too.

And I'm thrilled to have been hosted on CraftGossip.  Thanks to Elaine for doing that.  I confess to not knowing what CraftGossip is but I spent a happy few minutes looking through the entries and I'm in good company.


These might the the ornaments that I give to family.  Right now I've got them in my cubicle at work and people come in and smile. 

Smiles are good.

Cheers,

Sandy


Saturday, November 26, 2011


Hi Everyone,

At last month's Guild meeting, Wendy (the Wendy of Cabezel fame) wasn't sure about one of the shapes that she was playing with. It's about 2.5 inches square and I thought I could put it to good use so she gave it to me to play with.

Dad has been wanting a replica of one of my pieces that he calls "The Three Wise Men", which you can see here. But he was disappointed that the original piece was only about 1.5 inches tall, also made with one of Wendy's Cabezels. I thought Wendy's prototype would be perfect to try out for this project and it worked really nicely.

The piece can no longer be called "The Three Wise Men", but I've decided that it can represent Dad and his four children.

For some reason or other I couldn't get the colours to come out the way that I wanted them in the photo, but you get the idea. It's also not as crooked looking as it is in the photo. I think there's some close up distortion going on. It's prettier than it looks.

I've already done another piece with the frame and I'll post more on that later. For me, Wendy's prototype is a keeper. It's such an easy way of making something that looks nice.

And my hobby room is still clean though I do have some putting away to do. I'm teaching the reindeer tomorrow at Guild so I've got my supplies strewn all over so that I don't forget anything.

Cheers,

Sandy

Sunday, November 20, 2011

Tutorial - Christmas Reindeer...


Hi Everyone,

I'm teaching how to make reindeer next week at Guild and thought that you'd like to learn as well.

Skills required: Beginner

Here's what you need:

  • Scrap clay that's somewhat brownish rolled on thickest setting, 2-3 inches long and wide
  • Brown clay that contrasts a bit with scrap clay rolled on thin setting, same size
  • 5 toothpicks
  • Coppery wire or other wire, about 12 inches, scissors or wire cutter
  • Red clay if making a Rudolph nose, black clay for regular nose
  • White and black clay to make eyes, pea size, or just use googly eyes
  • Something to colour the toothpicks with (I use a combination of Future and Pearlex)
  • Christmas embellishments
  • Optional - Pearlex powder in brownish colours for the body to highlight texture
  • Wire brush or sandpaper for texture
  • Glue (I like Weldbond)

Step 1 - Paint the toothpicks and set aside to dry.

You can paint them gold or brown or any other colour that you want. I simply made a puddle about 1 cm across on a tile with Future and poured some bronze PearlEx into it and then used my fingers to apply to the toothpick. I put one end in some scrap clay to allow to dry. You can see the toothpicks in the photo below.

Step 2 - Form the logs for the body and the head

Layer the thin brown clay on top of the scrap clay and run the two sheets through the pasta machine and three or four sizes down from the thickest setting. This combines the clay into a longer sheet.

Roll this sheet into a log with the good colour clay out. Cut 3/4 inch off the log to make the head. You'll note the jelly roll cane on the inside which simulates the rings on a tree.

Compact the rest into a log that's about 1.5 inches long. These are approximate estimates, you may decide that you want a smaller head, bigger body, etc. Leave it to your taste. The logs shouldn't be perfect - they're supposed to simulate wood.

Shape the nose of the head using a blade. This should be rustic - it's kinda like sharpening a pencil with a knife for those who have done that. Five or six cuts should be enough - it should look like an axe was taken to the log.

Do the same for the chest and tail of the body log.

You can texture the log if you want - use coarse sandpaper or a wire brush and drag it along the body and the head to simulate a bit of wood grain. Bring up the texture with some PearlEx or other powder as an option.


Step 3 - Insert the legs and neck


This step simply creates the holes for the leg and neck. You can remove the legs prior to baking, or you can leave them in. Either way you'll be pulling them out to glue them back in. Make sure that Rudolph stands up on his legs and that the head doesn't make him tip over.

I find that cutting the toothpicks to 2/3 length seems to work the best. But you may decide you want him to look more leggy or more like a dachsund. The choice is yours.


Step 4 - Create the antlers and hanging loop.


The thickness of wire is a matter of personal preference and taste. Thinner is easier to work with.


Cut a piece about 6 inches long and fold in half. Start twisting at the fold like you were twisting a garbage or twist tie. Go about a half inch or so. This is the tallest part of the antler. Take one of the loose ends and about a half inch in fold it again and then start twisting at the fold to make the second antler. Twist the two strands together a few times and start the third antler by doing another fold. Twist the third antler and then continue twisting down the rest of the wire to make the complete antler.

This sounds more complicated than it is - hopefully the picture will show you what to do. On the right is the completed antler and on the left is the start of the second antler.

Create a hanging loop if you want him to hang. Loop some wire around a pencil or other cylinder shape to get the size hook that you want. Twist the ends together like you did for the antlers.

Insert the loop on the top of the head near the back. If you're not sure of the position, put some ribbon or thread through the loop and hold the deer up by the ribbon. He should hang somewhat normally.

Insert the antlers towards the back of the head on either side of the hanging loop or a bit further ahead.


Step 5 - Create the nose and eyes.

Use a bit of red or black clay here if you like. Since this is Rudolph, I cheated and used some miniature plastic globes that are supposed to represent lights that I bought at the Dollar Store. I pushed the ball into the clay and then took it out again so that it didn't bake.

Create black and white eyes if you like, or be lazy like me and give him googly eyes.


Step 6 - Bake for 45 minutes to an hour.

I bake the antlers in the deer and take out toothpicks and nose if it's plastic. In this particular case the neck toothpick didn't want to come out of the body and was really firmly wedged in so I just let it be and baked it like that.

Don't worry if the clay cracks. It can on the thicker pieces. But this is supposed to be dried wood which often has cracks.

The picture to the left is before he baked.


Step 7 - Assemble and embellish.

After he's cooled, put some glue on the ends of the toothpicks and insert back into the body. If you're like me the leg holes have gotten quite big with all the manipulation of trying to make him stand.

Glue on the googly eyes, insert the nose if you haven't already, and add something for around the neck. You can make it out of clay if you like or use other Christmas trinkets.

That's it!

All in all, he's pretty easy to make and there shouldn't be too many frustration points since imperfections are expected.

And surprise of surprise I've managed to keep my hobby room clean. Stuff went back where it was supposed to right after I finished with it.

Enjoy!

Sandy

Sunday, November 13, 2011

Our new key holder

Hi Everyone,

This was one of my many, many, many unfinished projects because of my disaster of a hobby room.

Now that everything is clean, it only took about 20 minutes to finish.

My husband has been complaining that our keys seem to be multiplying and we've got nowhere to put them.

The backing to this is what you would put magnetic tins on - sort of what you see here. I never did get around to using it for its original purpose and it has been sitting in my hobby room for a while.

I decided to cover the metal with textured and pearlexed scrap clay. I punched out about three holes per backing square and put rare earth magnets in the holes. The clay is glued on the backing with Weldbond.

Husband is going to put this close to our doorway and it'll hang all (I hope) of our keys. I put most of the keys on and gave it a good shake - the keys stuck where they should have.

And I'm thrilled to say that everything has been put back in its place in the hobby room so I still have a tidy room to tackle my next project.

Cheers,

Sandy

Saturday, November 12, 2011

The best money I've spent all year...


Hi Everyone,

As some of you have noticed, I haven't been blogging for quite a while.

Why?

A lot of reasons, but probably one of the biggest was my complete disaster of a hobby room. It's been worse than it's ever been, including worse than the photos shown here. I was down to about 4 square inches of workable space with a small trail to walk through to get to it.

Every time I tried to get enthusiastic about claying, I'd venture in, spend a couple of minutes in contemplation, and then quietly and quickly walk back out.

For some reason or other, I couldn't find the strength and willpower to tidy it. It was just such a daunting task. And every time I got more than my 4 square inches of space available, I would start something new.

I am a starter, not a finisher, by nature. It's not unusual for me to get a sweater knitted except for the last sleeve and then lose enthusiasm.

So I finally got smart and asked my friend, Janice, to help me for a fee. I've mentioned Janice before here. She's typically perfection when it comes to claying. Turns out she actually likes organizing other people's spaces. And she's very, very good at it.

It took her about 10 hours to do this. I have underpaid her in my opinion, and she thinks I've overpaid her.

I can't promise how long this will last, but it's certainly done wonders for my enthusiasm.

Cheers,

Sandy

Sunday, June 5, 2011

I have been busy...but not claying

Hi Everyone,

I've been incredibly busy the last while, but nothing much related for clay. Work requires longer hours this time of year and when I do come home I've been planning my mother's cruise and what to do. I've probably spent close to 100 hours on this project and it's finally come to an end. Mom's only real criteria was that the cruise have a private balcony and that they spend two days in Russia.

Her husband's criteria was that he would prefer to see Rotterdam.

That turned out to be a miscommunication which I learned only after I booked the cruise. He thought he had been told that Rotterdam had direct flights that he could use his air points for. It would have been so much easier if that had been the case.

Sounds simple, eh? Not so much.

I really, really, enjoy planning trips, and, according to my husband, it's something I'm pretty good at.

But it's harder when you're planning it for someone else then for yourself, particularly your mother who you feel very protective of. Her husband? Not so much - he's younger, much bigger, and not likely to get taken too much advantage of. He's been an Indian chief and a prime negotiator in multi-million contracts. Don't get me wrong, he's been a part of my life for more than 30 years and I love him, but I don't feel as protective of him.

This was very much an up and down project from despair to not getting it right to wanting to high-five anyone I could find on the street because I was so impressed with myself for what I had come up with (through the help of many, many others).

I finally think it's perfect so I'm in high five mode at the moment.

What I researched:
  • Which cruise line and which departing port
  • Which company to give a tour of St. Petersburg, Russia
  • What they should do before and after cruise
  • Where they should stay before and after their cruise
  • What they should do during cruise
  • How to get them to places before and after cruise
  • Best flights and locations to fly into

They're flying into Brussels to take a cruise out of Rotterdam. I spent days looking for a place for them to stay in Rotterdam and wasn't happy with any of my choices. I use tripadvisor as a bible for my choices and Cruise Critic is also becoming my new best friend. Finally I found the solution through some help on many different fronts. Instead of Rotterdam, they're touring a bit of the Netherlands.

They are going to Delft, first, then The Hague. The cruise has stops in Copenhagen, Berlin, Talinnin, St. Petersburg, Helsinki, and Stockholm (though not necessarily in that order). After that it's a trip from Rotterdam to Brugge (Bruges, Belgium) for three days and then finally on their way home.

To start, they're getting picked up at the airport and transported to Delft where they basically get to pass out after an overnight flight. The next day they've got a private tour of Delft and The Hague through The Dutch Travel Advisor (also based on feedback from Cruise Critic). Edwin has been great to deal with and if his tours live up to his service via e-mail I'm sure Mom and her husband will be in for a real treat.

During the cruise, I've organized a private tour for them in Russia based on feedback from Cruise Critic. It'll be just the two of them with a guide for two days. The company I chose was SPB Tours and so far the responsiveness and the care they put into their answers has been wonderful. So much so that I used the same company for their tour of Berlin. I hope it lives up to expectations but I can't see how it won't because for the life of me I've been unable to find anything negative about them. Much easier than booking a tour through the cruise line which would have required that my parents give up their passports prior to the cruise to get Russian visas.

My last despair from yesterday turned into joy today based on a suggestion from RonaldoC on tripadvisor which turned the light on for me by suggesting that they don't stay in Brussels and go to Brugge. Right now they're on their own in Brugge, which I chose over Brussels for the intimacy and quiet but are staying at a lovely combination of B&Bs called The Huyze Hertzberge and the Cote Canal which I just confirmed about an hour ago. The owner, Caroline, gets rave reviews on her service so I don't feel bad about leaving them on their own under her care.

I probably put more effort into planning their trip than I would have my own. I chose quality and service over cost for them. I turned down several highly ranked places that had iffy service.

I love the contrasts that I've chosen for them and here are a couple of pictures of the places that they're staying.

Day 1, Delft, Hotel de Emauspoort, ranked #1 by TripAdvisor and I'm so thrilled for them to be here, they're staying in the Vermeer room. Renata and I spoke over the phone so that I could get some answers to some questions and I immediately fell madly in love with her voice and kindness. They've endeared me forever in how they're going to try to accommodate an early arrival and they sound genuinely interested in making sure that my parents are taken care of.
Hotel de Emauspoort: The de Emauspoort Hotel

Day 2, The Hague, the Steinberger Kurhaus hotel, ranked #9. It's got a casino which will be fun for Mom. I don't have any personal interaction with the hotel, Edwin is arranging it, but with a picture like this, how can it go wrong?

Steigenberger Kurhaus Hotel: Den  Haag 2004: Schebingen - Kurhaus

Quite the contrast in day 1 and day 2, eh?

Anyhow, that's what I've been up to the last several weeks. Now I've got some household stuff to work on and then maybe I can get back into claying.

Now just to keep my fingers crossed and a huge great big monster thank you to everyone who helped me with everything.

Cheers,

Sandy

Friday, May 6, 2011

The finished birthday cake


Hi Everyone,

I took the day off and decorated my husband's birthday cake. Here's the final product. The verdict from my husband is that it's a little too girly and if I had gone with a green icing for the background instead of the yellow then it might have been man enough for him. Having said that, he's OK with it and happy that I'm proud of it and will be very content to eat it over the next several days.

I like it, but it's a bit too symmetrical for my tastes and to do it again I'd do the roses differently.

I was kept company by a couple of wonderful girlfriends and the cake went together very smoothly. Wine took away most of my rest tremor and the roses weren't too bad to make. I am loving the paper towel method of smoothing the buttercream icing - I wish I had discovered it years ago.

I think this is one of the easiest cakes I've ever done - other than tinting a whack of icing the wrong colour of yellow, which will be used for something else, there were no major problems.

I still have some cupcakes to decorate and I've got some ideas for that. I've also got an extra round cake to do and a lot of icing left over so I will probably play a bit more. But this is the official birthday cake.

Cheers,

Sandy

Tuesday, May 3, 2011

Pretty impressed with myself


Hi All,

Friday is my husband's birthday and every year I do a cake for him. This year I've decided to go elegant and traditional. I've never successfully done buttercream roses before and I thought it was time to learn.

These are my first attempts - I'm happy enough with them that I think I can do them for the cake.

The centre one is made out of modelling chocolate, but my husband decided that he didn't like that so the icing roses it is.

I'll post photos later of the hopefully very successful cake.

Cheers,

Sandy

Saturday, April 30, 2011

A free video


Hi All,

Cindy Leitz, whose work I admire and who is a talented video tutor for clay has announced that she will be giving access to a free video starting Monday, May 2nd.

A few years ago she developed a teardrop skinner blend video that shortened the Skinner blend technique be several minutes and gave that away free. I forget to use the technique but I think some of that is because I work with a stiffer clay. When I do remember to use it though I ask myself why I don't use it all the time.

The new technique that Cindy is giving away for free is how to shift your skinner blends. I've done some blend shifting based on Lindly Haunani's technique, but Cindy always manages to make something tedious look a lot easier, so I'm curious to see how it compares.

Anyhow, Cindy doesn't give away free tutorials very often so do take advantage of her freebie.

Here's the link: Teardrop Blend Shift a la Cindy Leitz.

Cheers,

Sandy

Sunday, April 24, 2011

The Aurora Borealis Technique


Hi Folks,

At Morrisburg Diane had some clay that she was playing with to cover a pen. When I saw the results I was blown away - the colours are beautiful and I loved the free-form of it.

The technique is from Cindy Leitz and you can see a preview here.

Despite my strongly worded hints and outright begging, Diane wasn't willing to part with the pen, which is the top pen in the photo. I can't really blame her, the pen was perfect and we don't often get perfection at Morrisburg, so she was entitled.

But, Diane was kind enough to give me my very own sample to play with. After our Morrisburg adventure with pens (thanks, Margi!) I went to Lee Valley and bought some other pen kits to play with. The bottom picture is my attempt using the clay that I was given by Diane. I covered it with Future and I'm very happy with it.

Because we're penny pinching at home for the next while I'm not spending a lot of money on clay supplies or tutorials. I've also got enough experience that I can usually figure out what I want to do through extra resources on the Internet. But Cindy's technique is definitely unique and not something that's easy to reverse engineer, nor do I want to try because it is so different. It is a bit reminiscent of Desiree's braided cane but I do know that it's a whole lot simpler.

I did e-mail Cindy about possibly doing group prices since I know many of the women at Guild would love to learn it and she's considering it. I was also so very pleased to hear that she's definitely thinking about offering her videos on a one-off basis.

I can hardly wait!

Cheers,

Sandy

Tuesday, April 19, 2011

My favourite piece I've ever made


Hi All,

I thought I'd post a close up of one of the pieces that I made at Morrisburg. Inspiration came from just about everywhere on this piece.

It's made from one of Wendy's Cabezels and is about 1.5 inches tall.

The background is some scrap clay that I've had forever and have been just waiting for the perfect thing to make with it. It reminds me of our most amazing trip to the southwest a few years ago.

The bodies were from a spiral cane made by my new good friend, Diane, using the technique that I taught at Morrisburg - and when she showed me the cane I promptly demanded a piece and I knew it would make wonderful people. The heads are Jones Tones foils using the smallest Kemper cutter circles. Gera Scott-Chandler was my inspiration for the people - she was doing a lot of work with pebble people last year and I loved the simplicity of the shape.

Gera Scott-Chandler taught us how to use UV cure resins and I knew that this piece cried out for that. It took me three tries to get the resin right.

My mother, who attended Morrisburg with me, started looking all pathetic eyed and wistful about the piece, so I ended up giving it to her (gladly, or pretty much gladly, of course). I have enough bits that I can make another.

I love it and I was smiling as I was making it.

It's so much nicer when things go together the way you want them to.

Cheers,

Sandy

Sunday, April 17, 2011

Wow, it's been a while...


Hi Everyone,

I'm not sure why I haven't been blogging - I seem to have lost a lot of creative oomph. I really wish I were a tidier crafter because whenever I venture into the disaster that is my hobby room, I loose momentum, particularly in the winter.

So I haven't been claying as much.

But now that the sun is out, the days, are longer, and it's starting to be beautiful out, I feel compelled to venture into the depths of the basement to start my hobby once again. It makes no sense, I know, but it happens each year

And, last weekend was Morrisburg, my annual claying event that I love. I'm happy to say it was my second favourite gathering ever. We switched up the format a bit. Instead of finished projects and workshops we had several 15 minute demos. I think the format works well for people that are well versed in claying and it was just perfect for my attention span.

I taught versions of the spiral cane that I posted on my blog last year which you can see here. The samples in the first picture are those that were created with the spirals - they're good as an accent piece.

I've modified the technique a bit - I no longer extrude the squares that go into the extruder - it's sloppier than that now, and easier, since you only extrude once.

The teardrop disc works particularly well and the inspiration came from 2 Good Claymates for the flowers since she uses the teardrop with her extruder cane. As I was assembling the flowers I realized that four of the teardrops make a perfect butterfly. I knew my friend, Janice, would be thrilled, and she was.


I have more pictures to post later. Maybe I just needed a bit of a vacation.

Cheers,

Sandy

Thursday, February 17, 2011

And the winners are....


The three winners are:

1. Belinda
2 Dom's Little Shop
3. Leslie H

I'll be contacting them and asking them to provide details on what colours they would like.

I've also decided not to limit my BOH to 100, if I can get to all 150 people, I will.

I had a lot of fun visiting all of the blogs. I was most drawn to glasswork, photography, and, of course, others that were making earrings. But everyone had beautiful gifts to offer and it was a treat to see them. I've made some new friends and have bookmarked blogs that I'd like to visit again.

I'm looking forward to next year's festival, which will be slightly different, but will have many of the same participants.

Thanks to all who stopped by and congratulations to the winners.

Cheers,

Sandy

Wednesday, February 16, 2011

My One World One Heart 2011


Hi All,

I dabble in polymer clay and have been for several years. I try to post a blog entry on clay at least once a week but admit to falling short at times. We have a guild here in Toronto, Canada that's always looking for new members so anyone who is local is more than welcome to stop by and say hi, but that's not a pre-requisite by any means.

I'm participating in the OWOH giveaway this year and many thanks to Lisa of Whimsical Bohemian for offering to organize this incredible event. As of today when I checked, there were over 600 bloggers participating world-wide.

My offerings are custom paperclip earrings that are embellished with polymer clay. I discovered these paper clips at our local stationery store and thought that there must be something I could do with them with clay.

You can choose the centre colours and whether you want them patterned, shiny, or simple. I'll be giving away 3 pairs, with the random draw winners to be announced on February 17th.

The rules are simple.

1. You must have an active blog that I can visit.
2. You must leave a comment on my blog with a way to find you.
3. I think that's it.

Your blog can be about anything - sometimes it's the side trips that I make that are the most fun.

Here is a picture of some colour and pattern options.

If you'd like a link to how to make bracelets out of the paper clips, go here. It'll also give a sense of different colour variations.


In addition to the earrings, I promise to make Bottles of Hope, which are clay decorated bottles that are given to cancer patients. I will do this on behalf of the first 100 bloggers that leave comments and the bottles will go to patients in Toronto. If you'd like to be notified when I make a BOH in your name, please leave me a way to contact you. Last year I managed to make all 100 bottles, but I was overly ambitious in trying to link each bottle to a blogger's website. So this year I may not link to your post, but I'll at least state your name.

You can see some of my bottles here, here, and here. A picture is below as well.


Enjoy the blogging event!

Cheers,

Sandy

Sunday, February 13, 2011

Our favourite resort - Hawksbill Beach Resort, Antigua


Hi Everyone,

We've just gotten back from our favourite resort in the world. Actually, it's my second favourite resort, but we can't afford to go to my favourite resort, Petit St. Vincent more than once every 10 years.

Our second favourite resort's name is Hawksbill Beach Resort in Antigua. There's nothing fancy about the resort, it's definitely three star.

But we love it. This was our fourth visit to the resort after having spent 20+ years visiting various parts of the Caribbean.

All we do is eat, read, watch the water, and live on the beach. This is our completely unwind vacation. We don't tour, we don't mingle, and we're often in bed by 9:00. We're old fuddy-duddies on this vacation.

It's a peaceful resort - for the most part there is no loud booming music. The average age is probably 65 and there isn't much to do for activities. You can still come to one of the four beaches at 10:00 or noon and not have too much problems finding a beach chair.

It has its hiccups - and all of the reports on Tripadvisor including the positive and negative are true - it just depends on what's important. If you want glamour and social activity, this isn't the place.

But if relaxing on a beach where there might be more than 50 feet between you and the next person and having a hard time reading because your eyes drift back to the beautiful turquoise waters or because you start to nod off is more your style, then this is definitely a bit of heaven.

On a side note, I try to find books to bring down to read since I go through about 1.5 books a day. This year I managed to get a special on Ian Flemming's James Bond books and I bought 6 of them down with us. I've seen the movies but haven't read the books. They were written in the 1950s and 1960s. Times certainly have changed - in Casino Royale, his first book, within a few pages James Bond lights up his 70th cigarette of the day. There's a full chapter on the excitement of catching a cheater at the card game Bridge in a different book which I didn't understand at all.

We're already looking forward to our next bit of heaven next year.

Cheers,

Sandy

Thursday, January 27, 2011

Bummer!

Hi Everyone,

I seem to have already broken my promise to be better at blogging about clay. My excuses are that I've been busy and my hobby room is an absolute disaster.

I'm trying to do a number of things in clay. I owe Fiona a pair of earrings since the ones she made me are quite fun and I've been enjoying them. I want to give away something clay like at our guild's New Year's party this weekend, and I want to create some things for the One World One Heart giveaway.

Nothing is cooperating. Lately my "gee, it's almost perfect, I just want to add ONE more thing", has turned into "drat, well that didn't work out at all". Some examples:

I've made a pair of earrings that I would be quite happy to own but I decided that they needed one more thin layer of liquid clay on them. That liquid clay hid a couple of specks of gold coloured dust that are quite noticeable against the beautiful sapphire blue background. I'm not sure what I'm going to do about that. I might see about some embellishments, but they really are beautiful just the way they are. I may end up keeping them.

I had another pair of earrings made, again that I would have been quite happy to own, and I had been patting myself on the back for finally doing an antiquing job that I liked on them. But I decided that the backs of the earrings weren't pretty enough so I dabbed some ink on them. The ink spilled over to the front and messed up my beautiful antiquing job. So I had to improvise. I think it ended up OK and these will likely go to Fiona, if she wants them.

Since my hobby room is such a disaster I'm down to about a six inch work space. That is definitely not helping.

Here's a photo of tonight's disaster. Normally I'm very good about capping my pearlex as soon as I'm done with it. But tonight I'm wearing a big floppy shirt to keep out the chill and as I turned around to look at something else I knocked my container over and onto the waiting open box of cookie cutters that I use. This is going to be a pain to clean up. The powder is also on the floor, on my pants, on the counter, and down the cupboard.

Bummer!

Oh well.

Sandy


Tuesday, January 4, 2011

One World One Heart 2011


Hi Everyone,

I've been participating in the One World One Heart event for the last two years. I'm both happy and sad to say that the event will be happening in 2011. I'm happy to participate but sad that this will be the last year.

For those that aren't aware, Lisa, the Whimsical Bohemian started this project years ago as a way for bloggers to get to know each other. Door prizes are offered by each of the bloggers to random winners. Last year there were over 900 participants. It's an amazing effort and kudos to Lisa for the monstrous organization that it must take and I can certainly see why she would make this year the last year.

Anyhow, the door prize for my blog will be posted on January 30, as well as for all the other bloggers.

All bloggers are allowed to enter. You can read about the rules at the link above. If you're at all interested please do let her know and let's make this final year the greatest ever.

I'm excited but need to figure out what I'm making.

Cheers,

Sandy

Monday, January 3, 2011

Personal New Year's Resolutions

Hi All,

In my last post I mentioned that I would post my personal New Year's resolutions. Right now I have three that I'm willing to share.

1. I want to do the splits. This one may take me all year and I have no idea whether it's possible or not. I'm one of the least limber people that I know and right now I'm not even sure whether I can spread to a 90 degree angle let alone 180. There's no particular reason for this goal, it's just something I've always envied of other people.

I've been looking up a number of websites on how to do the splits. Many of them are intimidating with pictures of young girls that are already flexible. I think I've found the website that I might be using - it's from Run The Planet and is here.

2. To complete a 9 day cleanse from Isagenix. A good friend of mine, Patti, needed a few more people to sign up as part of her Isagenix team and offered the cleanse at a ridiculously marked down price. I bought the system and since at some point this winter we'll be off to the Caribbean for a week I thought it would be good to try this in the New Year.

I'm not normally an herbal supplement, detoxify, etc, etc, person, but I figure I can do just about anything for 9 days straight. Christmas parties and feasting are over and I don't have a lot of work scheduling that will make this difficult so I think I'm good for the next couple of weeks.

Supposedly this will give me more energy, reduce cravings, make me feel good, and of course, the kick start to weight loss. I've decided to log my day-by-day progress. I confess to being a bit of a cynic to the other benefits so it'll be interesting to see whether I notice them or not.

3. Lose between 10-15 pounds. A few years ago before the miscarriage I had lost 20 lbs and maintained that loss for more than two years. Over the last three years 10-15 of that has crept back on. I like how I look 10 lbs lighter and in general I feel better when I'm there. When I turned 45 I picked up five pounds almost overnight and they're not easily budging. I've been reading about perimenopause a lot lately and it seems that I should fight now rather than later.

I've decided to create a new blog for the tracking of these goals and other things. You'll be able to find it at Sandy's This and That, at least for now (though as I write this there are no entries). I have mixed emotions on creating a separate blog. Many of the blogs that I read combine their clay with their personal thoughts and that's a great way to get to know the people. I consider some of these bloggers my friends and am always open to meeting others. There are times, however, when it's simply nice to look at clay things and some of the blogs that I haunt are also along those lines.

I suspect in my case that it might be too easy to turn this particular blog into a "Sandy's life with a bit of clay thrown in" so I'll do the separate blog for that personal stuff and see how it goes.

Anyhow, wish me luck on my goals. I'll let you know how it's going now and then here.

Cheers,

Sandy

Saturday, January 1, 2011

My 2011 New Year's Resolutions...


Hi Everyone,

I've had a miserable cold this last week and most of my Christmas vacation was spent moaning and being pathetic on the couch. This morning I woke up with only a trace of a cough and almost 7 hours of uninterrupted sleep. I feel human once again and glad to be so.

It's time for New Year's resolutions. I didn't quite make all of my last year's resolutions. I did get to a total of 32 cane entries instead of the 52. The five pounds that I wanted to lose have now turned into 10. I did make more than 100 Bottles of Hope, but I only published about 80 of them. I stopped blogging for a bit as I succumbed to my addiction to Frontierville, which has now been cured.

This year I'm setting some personal and some clay related. The clay related are:

1. To make 100 Bottles of Hope.
2. To make 3 pairs of earrings to give away in the last ever One World One Heart Event
3. To blog about clay at least once a week
4. To finish my bottle of canes
5. To offer to exchange earrings once a month (the first set is for Fiona that I promised months and months ago).

I have other personal goals that I've got and I'll publish those in another blog entry.

The Bottles of Hope in this blog entry were inspired by Gera Scott Chandler and they're in memory of my Aunt Sharon who passed away within a month of diagnosis of cancer. She was surrounded by family when she went and these seemed appropriate.

My sister's family has been devastated by her husband's mother's battle with cancer so unfortunately it doesn't seem right to wish everyone a Happy New Year since my thoughts focus on them. Instead I will close with an Irish blessing that I found here. It seems appropriate since it's raining here today.


May the blessing of the rain be on you—
the soft sweet rain.
May it fall upon your spirit
so that all the little flowers may spring up,
and shed their sweetness on the air.
May the blessing of the great rains be on you,
may they beat upon your spirit
and wash it fair and clean,
and leave there many a shining pool
where the blue of heaven shines,
and sometimes a star.


Sandy