Sunday, May 23, 2010

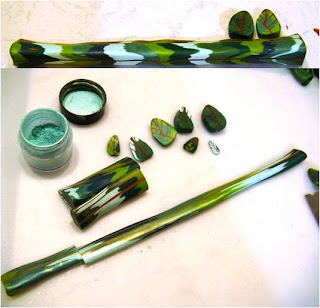
Eye Canes - week 21 of canes and Bottles 42-45


Hi Everyone,

A while back I posted some photos of some eye canes in the making by Sue C of Chasing Rainbows, Too.  Some people left me feedback on the posts, including a link to Keru's website that apparently had a tutorial.  I looked, but wasn't able to find it.  Eye canes went on the back burner.

But last week Kerstin, of Keru added a comment on the blog post with the exact location of the tutorial.  I don't know why I couldn't find it before.  When I went looking the second time it was right there in front of my face.  I'm going to attribute it to the invisibility spell that overcomes items on my work surface.  Who really knows.

Anyhow, Kerstin's tutorial is fantastic!  She does a great job in explaining how to make the cane.  Normally I don't follow tutorials exactly with colour choices but I had in mind that green would be a good monster colour set of eyes.  Eye canes are easy, particularly with Kerstin's excellent description.  Use the extruder for your square canes and you'll be fine.  I spent more time choosing the colours and extruding than the rest of the cane work.

While you're on her site, if you've never seen how to cut thin slices of canes, take a look at Kerstin's tutorial on how to do it here.  I'd never tried her method until today and I like it much better than some of the other methods that I've tried.

One of the great things about trying out canes is that they're almost always suitable for Bottles of Hope.  As promised during the One World One Heart event, I've committed to making 100 Bottles of Hope.  These were fun to make and are Bottles 42-45.  At this rate I appear to be on the way to meeting my goal.


As usual these were made while listening to the CD that Renee gave me.  And, as promised, these are made on behalf of:

42.  Toscania art-life
43.  Tamara
44.  Yvonne
45.  Rein

Cheers,

Sandy

Tuesday, May 18, 2010

Flower variegated cane tutorial - week 20 of canes

Hi Everyone,

I'm actually a week behind on my cane blog entries so this week you get two blog entries on canes. 

I've had some positive feedback from the variegated leaf cane and it inspired me to do another tutorial on the skinner blend version of the variegated cane.  Rather than do it with leaves I thought I would show how it's done for flowers.

It's no secret that I don't like making flower canes but I can easily handle cookie cutter canes so that's what this one is.

You can use the disc method that I showed in the previous blog post to make the flowers or you can use a skinner blend plug.  In this tutorial I'll show the skinner blend plug. 

The tutorial is very wordy, but the words mostly just provide tips that wouldn't be obvious from the photos.


The Skinner Blend Part
The first photo shows my skinner blend.  I've simply laid a bunch of coloured clay onto a pearl/white mix sheet.  Both the layers and the sheet are a medium thickness and the sheet is the width of the pasta machine.  I didn't do anything in terms of planning the colours other than to make sure that I had stripes in different locations of the colours that I wanted.  You can also see that I didn't worry about making nice even triangles or any sort of precision.  These colours were bits that I had laying around that weren't enough to do really anything else with. 

The resultant blend is what I call a skinny skinner blend.  Roll the blend up and compress it into a flat plug that's at least as large as your cookie cutter.  Don't worry about precision here.  I like to start with canes that are about 1-2 inches tall so that's how short my plug is.  With cookie cutter canes and complex shapes you really don't want it a lot taller than the cookie cutter since you'll have to continue to push the cutter through the clay.

To do it again I would leave more white.  Try to get a good mix of light and dark.
The Cutting Out and Assembling Part
Now you're ready to start making the flower. I've started the imprint of the cookie cutter which allows me to cut my centre line.  Cut the plug in half.  This allows you to more easily remove the clay that's on the inside of the cookie cutter.  This part can be a bit fiddly.

Once the two halves have been cut you can start to add detail to the petals and the centre.  I simply sliced the cane into the petal shapes and then took out a bit in the centre.  It's easier to remove the centre portion petal by petal.  You can see how I've done it in the third set of pictures. 

After I finished the detail I really wrestled with whether the white centre was too much.  I was tempted to start the centre again and add something in the very centre, at least another dot of colour so that there wasn't too much white.  But I got lazy and didn't want to do that.  I probably should have. 

Also, if you want, you can flip flop alternating petals to give it more interest.  So, petal 1 would show the topside of the cane.  Petal 2 would be taken out, flipped and then placed back into the cane.  If one end of your plug was blue and the other pink, then petal 2 would be pink on top.  Petal 3 would be blue, petal 4 would be pink, etc.  I didn't do it in this example because both ends of my cane happened to be blue and you wouldn't have seen the difference.


The Packing Part

Now it's time for the packing.  I'm a lazy packer.  I hate packing.  So if there's an easier way to do it, I'm in.  With cookie cutter canes packing is wonderful because you use the outside of the cookie cutter shape.  I've used translucent in this example but I could just have easily used white or some other colour.  A pale yellow probably would have been nice.

Layer your translucent into about four thicknesses thick.  Cut it into a squarish shape that's big enough to surround your cane with as much border as you want of translucent.  I don't tend to like a lot of border.

Press the cookie cutter into the block and remove the outside portion.  It's much easier if you cut a notch into the clay (image on the top left) and peel the clay away from the outside edge.  Take this peeled portion and wrap it around the flower.  This is so much easier when you're wrapping vs trying to fit the flower into the cutout.  Repeat the process until the flower is surrounded.


The Reducing and Final Product Part
 Now you're ready to reduce.  One of the reasons I like using a square shape for wrapping is that I find reducing squares easier than round shapes.  I can keep things in line better.  And with translucent if I'm stacking the canes they fit together easier.

You can see the final product here with the different variations.  I probably have too much dark blue and not enough of the lighter colours.  I also really should have put another colour in the very centre just for interest.  And the petal separators extend too far out and are too thick. 
But I'll be able to use the cane in Bottles of Hope and it serves as a general idea for those that are reading.

I'm sometimes not quite happy with my canes until I put them onto whatever I'm doing.  I suspect it'll be the case with these.  It's a bit of a trial and error process. 
You can also do different shapes - the hearts were a great hit at Morrisburg.  Happy faces are just about the easiest thing to create as well.  Stars in different colours would also work. 

A while back I did try it with a maple leaf cutter but the cutter was too detailed and it was too difficult to remove the leaf from the cutter without completely distorting the clay.  That one would take more planning.

Hope you enjoyed these tutorials.

Cheers,

Sandy

Sunday, May 16, 2010

Variegated leaf cane tutorial - week 19 of canes


Hi Everyone,

This week's cane entry is a tutorial that I did at Morrisburg. A while back Polymer Cafe started showing diagonal skinner blend canes. I tried one of the flowers to a completely underwhelming success because I didn't get the colours I wanted. It got me thinking that there had to be an easier way. I started experimenting and here's something that I've come up with. I've used colours with a lot of contrast in this tutorial since it shows better photographically, but if you wanted a more subtle touch you could use colours that were closer together. I didn't have time this week to finish some projects but I will soon and I'll post those since some of you will be wondering what to do with these.

This technique isn't for those that like perfection and order. The results are a bit more chaotic.

Step 1 and 2, making the cane plug
Choose four or five colours that you think go nicely together, run through the pasta machine at whatever setting you like, and then start cutting circles. The thinner the circle the more variegation you'll get. Stack them randomly or according to your colour preference (some will like a smoother transition between colours).


You could also do a skinner blend plug for this step though it should be a skinny skinner blend with many different colours (I tried looking for skinny skinner blend on line and couldn't find any good images). If you have Lindly and Maggie's book, Polymer Clay Color Inspirations, you can do something along the lines of what's shown on Page 86. I will try to post a photo later of what I mean.

You get more colour opportunities with this technique as it eliminates the colour loss at the end of the canes that you inevitably get while reducing. 


Step 3 and 4 - Make the veins of the leaf. 

You've got a choice now, you can do the leaf the traditional way which you can see here, but if you do do that with this particular layout you'll end up with different colours on each side of the leaf because you'll flip it.  So, for example, let's say your plug starts with a dark green and just by random coincidence it ends up with a light green.  When you assemble your leaf cane the traditional way you'll end up flipping one side over (look at the tutorial if you don't know what I mean) and one half of your leaf will now be light green and the other half will be dark green.  In the end there's so much variation going on that it's no big deal.

What I did for this particular cane is I drew out the veins that I wanted and then sliced into the clay along the lines and inserted my veins on each side.  I've shown the back side of the cane in the finished result so you can see a bit of a colour difference.  If you want, you can wrap the cane with a solid colour but then you won't be able to see the colour variations on the outside of the cane which won't help when it comes to slicing.

Step 5 and 6 - reduce the cane.

We're back to tradition here.  Reduce using your favourite method.  When you get about half-way, stop and cut the cane in half so that you've got some larger size cane.  I have a bad habit of getting carried away with the cane reduction and all of a sudden I end up with very small canes and not anything else.  You can see in the top photo of this step how the different colours are starting to shift and merge into each other.  Irregularity is fine.


On this reduction I thought I'd dust the canes with a little Pearl Ex.  It's a technique that Barb C taught us at Guild once.  It prevents the canes froms sticking together, makes them easier to slice, and also gives a wee bit of shimmer when they're embedded into a veneer.  I don't use the technique very often but thought I'd show it just for fun.

The end result
I have some Bottles of Hope that I'm doing with these and you could use them whereever else you use leaf canes.  This might be interesting with fall colours.  I'll try to post photos of those later.  We're having computer issues right now so it's difficult for me to get the photos in place.

I've done variations of this technique with hearts and flowers but those are different posts.

Cheers,

Sandy

Sunday, May 9, 2010

A new texture from Bev!


Hi Everyone,

I'm happy to announce that Bev is still creating texture sheets which you can purchase through Shades of Clay (my favourite clay store). 

She gave me her latest one, Bay Leaf, to play with and I used it at Morrisburg to create an earring holder which was willingly snapped up by one of the Morrisburg ladies.  I'm a sucker for leaf patterns and I'm thrilled with this one.  Most leaf patterns are innies, where the leaf portion is embossed into the clay.  Bev's pattern is an outtie which means that the leaves are raised and are out of the clay.  This makes it great for mica shifting which you can see at Shades of Clay here.  You can see the detail of the raised pattern here and if you look closely you can see that I used it in my Bottles of Hope here

I think this will quickly become one of my favourite texture sheets, right up there with feather boa, and, of course, x-mas text, which was one that I designed and still pat myself on the back for.

Bev's texture sheets easily go through the thickest setting on my pasta machine.  With Kato clay I hardly ever use a release though with the softer clays it's a good idea, particularly with some of the finer patterns such as crochet lace.  I hope she continues to come up with more patterns, but in the mean time, I'm very happy with my new pattern and look forward to using it as much as I can.

Cheers,

Sandy

Bounette's flower canes - week 18 of canes

Hi Everyone,

I'm still working on a couple of tutorials for canes that I'll be posting on this blog later (or perhaps I will submit to Polymer Cafe).  In the mean time, I thought I'd show you some canes that really caught my eye.  They're from Bounette, in France.  I love these and might have to re-think my aversion to making flower canes though I suspect that just getting the cane all the same shape all the way through might be a challenge for me. 

If you're ever wondering what to do with kaleidoscope remnants, the flowers might be the things to try.

Bounette is a beautiful caner - I love her work.  If you're one of those that have tried to make a butterfly cane and then don't know what to do with it, check out her work here

I'm also particularly fond of her colour scheme in the flowers here

She doesn't always do flowers.  A cute little house cane is here.

Her blog is in French but if you view it with Google translator it comes out OK with a bit of whimsy that isn't in the original version.  It seems to want to call canes ducks in English. 

Cheers,

Sandy

Thursday, May 6, 2010

Happy Birthday to my husband!


Hi Everyone,

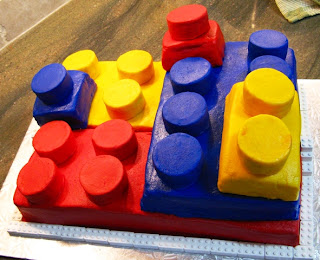
Today is my husband's birthday.  The only thing he really wants is a decorated birthday cake.  Unfortunately I'm not very efficient at decorating the cake so every year I have to take the day off.  This is this year's effort.  Last year's effort is here.   I'm pretty happy with it, despite a bit of lopsidedness, and my husband's response when he saw it was "Cool!" so I consider it a success.

I was originally inspired to make a Lego cake by the wedding cake that I saw here.  But I knew that those skills were way outside of my realm and patience level.  So, googling Lego birthday cakes brought me to a neat compilation of Lego birthday cakes here

While fondant would have made for a nice looking cake I wanted to stick with buttercream icing since my husband doesn't like fondant.  I was adamant, though, that I wanted the cake to be smooth in appearance.  I am normally icing skill challenged but by googling smooth buttercream icing I came across the paper towel method of smoothing.  It's brilliant!!! It calls for a crust forming buttercream icing.  Another google search and the buttercream recipe here which is my new favourite buttercream recipe though I reversed the almond and vanilla flavouring ratios.

I had help on this one. My friend, Janice, has been joining me on my cake decorating day for several years. Normally she just keeps me company but this year I recruited her to help with the round peg bits which are oreo type cookies that have been iced. She did a great job, as is usual for her. My focus was on trying to get the butter cream icing smooth.

Overall I think I spent about six hours making the icing and decorating the cake.  The colours took a long time to mix since I started off stingy with the concentrated paste.  I have the hardest time with getting the edges and the top seams to meet in icing.  They keep wanting to lift off of the cake which is very frustrating to me.  If anyone has tips for preventing that, I'd love to hear them.  Smoothing was another chunk of time.  Cleaning the granite counter also was a fair bit of time since I had powdered sugar everywhere!

We're off to dinner shortly.  It's Baton Rouge for our favourite ribs.  Then back home for cake and Baskin Robbins pralines and cream ice cream (no one else does pralines and cream quite like they do). 

It's a good day to celebrate.

Cheers,

Sandy

Sunday, May 2, 2010

Pretty pink presents for Patti


Hi Everyone,

Another good Morrisburg friend of mine, Gaby, did a wonderful class on surface techniques at Morrisburg this year.  While I had packed everything other than the kitchen sink I was woefully unprepared for Gaby's class, particularly since I had a pre-set goal in mind.  It seemed like for most of the techniques I didn't have some of the tools, particularly the acrylic paints.  However, I fell in love with using Future and Pearlex and the crackle effect.  My goal was to use Gaby's class to make some earrings.

My friend, Talar, had tasked me with making her a pair of pretty pink earrings.  I came up with these and then started to wonder if they were too bright.  I called Talar, and sure enough, she wanted something more pastel.  Oops!

My wonderful Morrisburg roommate, Patti, is in love with pink, so much so that her home was featured in Colin and Justin's Home Heist show on HGTV with the title "Not So Pretty in Pink" which you can see here.  While her home may no longer be overly pink, she still is infatuated with pink and gladly wears anything in that colour.  She was sitting across from me and when I asked her if she would like them she immediately said "yes!"  She wasn't in the least offended that they weren't originally made for her and when I had been calling Talar had been secretly hoping that Talar wouldn't like them.

I was happy to give them to Patti.  They're very much outside of my usual colour scheme.  They're certainly not perfect - if you look closely you can see that the centre spiral pattern goes up in one earring and down in another, but they would actually be something that I would wear. 

I'm glad that Patti likes them.

Cheers,

Sandy

Saturday, May 1, 2010

Morrisburg Face Canes - week 17 of canes


Hi Everyone,

My good friend, Louise, taught face canes this year at Morrisburg and did a terrific job. She started off with the eyes and several possible variations, let us play, then moved to the nose and cheeks, let us play, then to the mouth, let us play, and then showed us how to pack. The format was perfect and as part of the lesson she asked that we do a face cane swap. More than half the class participated, which is unheard of for canes at Morrisburg. A lot of that was due to Louise's excellent teaching style. She ran out of time to show hair which is why there are several bald faces in the group, but one of the great things about not having hair on the canes is that you can customize the canes more that way.

Louise encouraged us to experiment and you can see that the experimentation was rampant with everyone's cane full of character and charm.

My cane is the second from the left on the bottom row. I did put hair on my cane simply because I had one of the simpler canes in the mix.

Kudos to Louise! It was her first time teaching and we sincerely hope not her last.

If you're interested in other face cane information, Louise put together an incredibly thorough listing of all things face canes with what looks like about 100 links here.

I will write more about Morrisburg in the next few entries. Happy exhaustion and warm friendship is the best way to describe the experience.

Cheers,

Sandy