Hi Everyone,
I discovered foodgawker.com through my friend Diane Boivin yesterday. I hadn't spoken with Diane in a while but e-mailed her to let her know that I was impressed that she was famous because she was mentioned on Polymer Clay Daily here. That started up a conversation, in which she agreed to continue to talk to me since I had also been mentioned on Polymer Clay Daily.
She asked if I were a member of Pinterest.
I'd never heard of Pinterest but signed up because it looked interesting. I spent a few happy moments browsing Diane's Pinterest site until I discovered foodgawker. And then I lost a couple of hours as I scanned through the the selections. I became a foodgawker addict and posted several recipes to friends' Facebook walls that I thought would appeal to them. I've also forwarded on the link to several friends here at work and sighs of pleasure can be heard from the cubicles.
I'm not sure on the protocol on posting pictures from foodgawker so I'll leave it to you to explore. It's definitely worth a visit.
Here's the link - http://foodgawker.com/.
Enjoy. I sure am.
Sandy
Wednesday, November 30, 2011
Tuesday, November 29, 2011
Rudolph had babies...
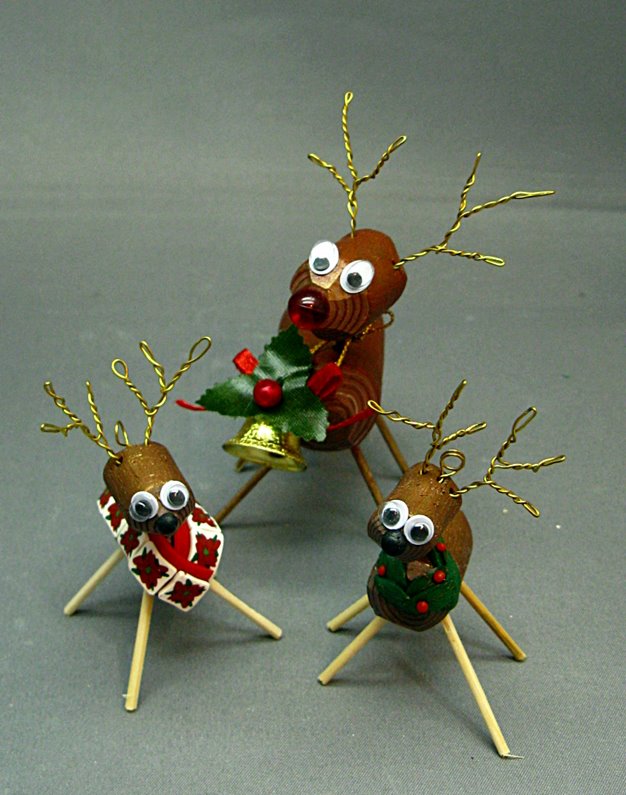
I taught a somewhat (we had a very small meeting) successful class at Guild and while prepping for the class I decided to make smaller reindeer. Essentially it's the same formula as the tutorial I posted earlier here, except that the jelly roll log makes two reindeer. Use less wire for the antlers and that's the only real difference in technique.
I can't seem to find the oval googly eyes in the stores, but haven't really looked too hard. One tweak to the tutorial above is that you may want to make an indent for the eyes before baking, particularly for the smaller ones. Otherwise they might end up a bit skewed looking. But that can be part of the charm, too.
And I'm thrilled to have been hosted on CraftGossip. Thanks to Elaine for doing that. I confess to not knowing what CraftGossip is but I spent a happy few minutes looking through the entries and I'm in good company.
These might the the ornaments that I give to family. Right now I've got them in my cubicle at work and people come in and smile.
Smiles are good.
Cheers,
Sandy
Saturday, November 26, 2011

Hi Everyone,
At last month's Guild meeting, Wendy (the Wendy of Cabezel fame) wasn't sure about one of the shapes that she was playing with. It's about 2.5 inches square and I thought I could put it to good use so she gave it to me to play with.
Dad has been wanting a replica of one of my pieces that he calls "The Three Wise Men", which you can see here. But he was disappointed that the original piece was only about 1.5 inches tall, also made with one of Wendy's Cabezels. I thought Wendy's prototype would be perfect to try out for this project and it worked really nicely.
The piece can no longer be called "The Three Wise Men", but I've decided that it can represent Dad and his four children.
For some reason or other I couldn't get the colours to come out the way that I wanted them in the photo, but you get the idea. It's also not as crooked looking as it is in the photo. I think there's some close up distortion going on. It's prettier than it looks.
I've already done another piece with the frame and I'll post more on that later. For me, Wendy's prototype is a keeper. It's such an easy way of making something that looks nice.
And my hobby room is still clean though I do have some putting away to do. I'm teaching the reindeer tomorrow at Guild so I've got my supplies strewn all over so that I don't forget anything.
Cheers,
Sandy
Sunday, November 20, 2011
Tutorial - Christmas Reindeer...

Hi Everyone,
I'm teaching how to make reindeer next week at Guild and thought that you'd like to learn as well.
Skills required: Beginner
Here's what you need:
- Scrap clay that's somewhat brownish rolled on thickest setting, 2-3 inches long and wide
- Brown clay that contrasts a bit with scrap clay rolled on thin setting, same size
- 5 toothpicks
- Coppery wire or other wire, about 12 inches, scissors or wire cutter
- Red clay if making a Rudolph nose, black clay for regular nose
- White and black clay to make eyes, pea size, or just use googly eyes
- Something to colour the toothpicks with (I use a combination of Future and Pearlex)
- Christmas embellishments
- Optional - Pearlex powder in brownish colours for the body to highlight texture
- Wire brush or sandpaper for texture
- Glue (I like Weldbond)
Step 1 - Paint the toothpicks and set aside to dry.
You can paint them gold or brown or any other colour that you want. I simply made a puddle about 1 cm across on a tile with Future and poured some bronze PearlEx into it and then used my fingers to apply to the toothpick. I put one end in some scrap clay to allow to dry. You can see the toothpicks in the photo below.
Step 2 - Form the logs for the body and the head

Layer the thin brown clay on top of the scrap clay and run the two sheets through the pasta machine and three or four sizes down from the thickest setting. This combines the clay into a longer sheet.
Roll this sheet into a log with the good colour clay out. Cut 3/4 inch off the log to make the head. You'll note the jelly roll cane on the inside which simulates the rings on a tree.
Compact the rest into a log that's about 1.5 inches long. These are approximate estimates, you may decide that you want a smaller head, bigger body, etc. Leave it to your taste. The logs shouldn't be perfect - they're supposed to simulate wood.
 Shape the nose of the head using a blade. This should be rustic - it's kinda like sharpening a pencil with a knife for those who have done that. Five or six cuts should be enough - it should look like an axe was taken to the log.
Do the same for the chest and tail of the body log.
You can texture the log if you want - use coarse sandpaper or a wire brush and drag it along the body and the head to simulate a bit of wood grain. Bring up the texture with some PearlEx or other powder as an option.
Step 3 - Insert the legs and neck
This step simply creates the holes for the leg and neck. You can remove the legs prior to baking, or you can leave them in. Either way you'll be pulling them out to glue them back in. Make sure that Rudolph stands up on his legs and that the head doesn't make him tip over.
I find that cutting the toothpicks to 2/3 length seems to work the best. But you may decide you want him to look more leggy or more like a dachsund. The choice is yours.
Step 4 - Create the antlers and hanging loop.
The thickness of wire is a matter of personal preference and taste. Thinner is easier to work with.

Cut a piece about 6 inches long and fold in half. Start twisting at the fold like you were twisting a garbage or twist tie. Go about a half inch or so. This is the tallest part of the antler. Take one of the loose ends and about a half inch in fold it again and then start twisting at the fold to make the second antler. Twist the two strands together a few times and start the third antler by doing another fold. Twist the third antler and then continue twisting down the rest of the wire to make the complete antler.
This sounds more complicated than it is - hopefully the picture will show you what to do. On the right is the completed antler and on the left is the start of the second antler.
Create a hanging loop if you want him to hang. Loop some wire around a pencil or other cylinder shape to get the size hook that you want. Twist the ends together like you did for the antlers.
Insert the loop on the top of the head near the back. If you're not sure of the position, put some ribbon or thread through the loop and hold the deer up by the ribbon. He should hang somewhat normally.
Insert the antlers towards the back of the head on either side of the hanging loop or a bit further ahead.
Step 5 - Create the nose and eyes.
Use a bit of red or black clay here if you like. Since this is Rudolph, I cheated and used some miniature plastic globes that are supposed to represent lights that I bought at the Dollar Store. I pushed the ball into the clay and then took it out again so that it didn't bake.
Create black and white eyes if you like, or be lazy like me and give him googly eyes.

Step 6 - Bake for 45 minutes to an hour.
I bake the antlers in the deer and take out toothpicks and nose if it's plastic. In this particular case the neck toothpick didn't want to come out of the body and was really firmly wedged in so I just let it be and baked it like that.
Don't worry if the clay cracks. It can on the thicker pieces. But this is supposed to be dried wood which often has cracks.
The picture to the left is before he baked.
Step 7 - Assemble and embellish.
After he's cooled, put some glue on the ends of the toothpicks and insert back into the body. If you're like me the leg holes have gotten quite big with all the manipulation of trying to make him stand.
Glue on the googly eyes, insert the nose if you haven't already, and add something for around the neck. You can make it out of clay if you like or use other Christmas trinkets.
That's it!
All in all, he's pretty easy to make and there shouldn't be too many frustration points since imperfections are expected.
And surprise of surprise I've managed to keep my hobby room clean. Stuff went back where it was supposed to right after I finished with it.
Enjoy!
Sandy
Sunday, November 13, 2011
Our new key holder
 Hi Everyone,
This was one of my many, many, many unfinished projects because of my disaster of a hobby room.
Now that everything is clean, it only took about 20 minutes to finish.
My husband has been complaining that our keys seem to be multiplying and we've got nowhere to put them.
The backing to this is what you would put magnetic tins on - sort of what you see here. I never did get around to using it for its original purpose and it has been sitting in my hobby room for a while.
I decided to cover the metal with textured and pearlexed scrap clay. I punched out about three holes per backing square and put rare earth magnets in the holes. The clay is glued on the backing with Weldbond.
Husband is going to put this close to our doorway and it'll hang all (I hope) of our keys. I put most of the keys on and gave it a good shake - the keys stuck where they should have.
And I'm thrilled to say that everything has been put back in its place in the hobby room so I still have a tidy room to tackle my next project.
Cheers,
Sandy
Saturday, November 12, 2011
The best money I've spent all year...

 Hi Everyone,
As some of you have noticed, I haven't been blogging for quite a while.
Why?
A lot of reasons, but probably one of the biggest was my complete disaster of a hobby room. It's been worse than it's ever been, including worse than the photos shown here. I was down to about 4 square inches of workable space with a small trail to walk through to get to it.
Every time I tried to get enthusiastic about claying, I'd venture in, spend a couple of minutes in contemplation, and then quietly and quickly walk back out.
For some reason or other, I couldn't find the strength and willpower to tidy it. It was just such a daunting task. And every time I got more than my 4 square inches of space available, I would start something new.
I am a starter, not a finisher, by nature. It's not unusual for me to get a sweater knitted except for the last sleeve and then lose enthusiasm.
So I finally got smart and asked my friend, Janice, to help me for a fee. I've mentioned Janice before here. She's typically perfection when it comes to claying. Turns out she actually likes organizing other people's spaces. And she's very, very good at it.
It took her about 10 hours to do this. I have underpaid her in my opinion, and she thinks I've overpaid her.
I can't promise how long this will last, but it's certainly done wonders for my enthusiasm.
Cheers,
Sandy
Subscribe to:
Posts (Atom)