Hi Everyone,
This week's cane entry is a tutorial that I did at Morrisburg. A while back Polymer Cafe started showing diagonal skinner blend canes. I tried one of the flowers to a completely underwhelming success because I didn't get the colours I wanted. It got me thinking that there had to be an easier way. I started experimenting and here's something that I've come up with. I've used colours with a lot of contrast in this tutorial since it shows better photographically, but if you wanted a more subtle touch you could use colours that were closer together. I didn't have time this week to finish some projects but I will soon and I'll post those since some of you will be wondering what to do with these.
This technique isn't for those that like perfection and order. The results are a bit more chaotic.
Step 1 and 2, making the cane plug


Choose four or five colours that you think go nicely together, run through the pasta machine at whatever setting you like, and then start cutting circles. The thinner the circle the more variegation you'll get. Stack them randomly or according to your colour preference (some will like a smoother transition between colours).

You could also do a skinner blend plug for this step though it should be a skinny skinner blend with many different colours (I tried looking for skinny skinner blend on line and couldn't find any good images). If you have Lindly and Maggie's book, Polymer Clay Color Inspirations, you can do something along the lines of what's shown on Page 86. I will try to post a photo later of what I mean.
You get more colour opportunities with this technique as it eliminates the colour loss at the end of the canes that you inevitably get while reducing.
Step 3 and 4 - Make the veins of the leaf.
You've got a choice now, you can do the leaf the traditional way which you can see here, but if you do do that with this particular layout you'll end up with different colours on each side of the leaf because you'll flip it. So, for example, let's say your plug starts with a dark green and just by random coincidence it ends up with a light green. When you assemble your leaf cane the traditional way you'll end up flipping one side over (look at the tutorial if you don't know what I mean) and one half of your leaf will now be light green and the other half will be dark green. In the end there's so much variation going on that it's no big deal.

What I did for this particular cane is I drew out the veins that I wanted and then sliced into the clay along the lines and inserted my veins on each side. I've shown the back side of the cane in the finished result so you can see a bit of a colour difference. If you want, you can wrap the cane with a solid colour but then you won't be able to see the colour variations on the outside of the cane which won't help when it comes to slicing.
Step 5 and 6 - reduce the cane.
We're back to tradition here. Reduce using your favourite method. When you get about half-way, stop and cut the cane in half so that you've got some larger size cane. I have a bad habit of getting carried away with the cane reduction and all of a sudden I end up with very small canes and not anything else. You can see in the top photo of this step how the different colours are starting to shift and merge into each other. Irregularity is fine.

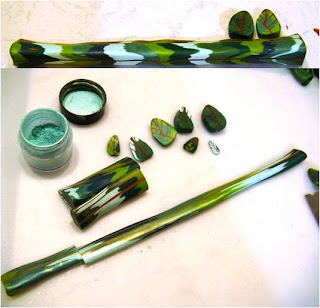
On this reduction I thought I'd dust the canes with a little Pearl Ex. It's a technique that Barb C taught us at Guild once. It prevents the canes froms sticking together, makes them easier to slice, and also gives a wee bit of shimmer when they're embedded into a veneer. I don't use the technique very often but thought I'd show it just for fun.
The end result
I have some Bottles of Hope that I'm doing with these and you could use them whereever else you use leaf canes. This might be interesting with fall colours. I'll try to post photos of those later. We're having computer issues right now so it's difficult for me to get the photos in place.

I've done variations of this technique with hearts and flowers but those are different posts.
Cheers,
Sandy
6 comments:
Cool leaves. Thanks for sharing the tutorial, will give it a go as soon as I can sneak some more clay time, very busy with other things at the moment :(
Oooh. Can't wait to try those. Might try a skinner blend technique though.
Awesome! Thanks for sharing. I have been collecting ideas for leaves and I can't wait to give them a try as soon as I get moved into my new house this weekend :)
Hi! I'm Gara from Canary Islands. I'm beginning to use the polymer clay and I was looking for some ideas. Thanks for sharing, your leaves are lovely! ^^
So beautiful leaves! Thank you for sharing so nice ideas!
Love this tutorial! Thanks so much for sharing!
Post a Comment