Occasionally I'll check my site meter to find out where the referrals are coming from. It often takes me on interesting journeys. Today I noticed that I had a few referrals from Tonja's Treasures where she discusses my posting on the Lee Valley sanding tools. Tonja gives a lot of credit to other artists, and Noelia Contreras' work drew my eye today with her transfer bracelets.
As I've mentioned before, I'm a sucker for leaf canes and one of the beads in her bracelets really called my name. It's the multi-leaf one.
Noelia's work really takes my breath away. We're all drawn to particular styles and I find I love her colour choices and shapes. I wish I knew how she makes the chocolate icing on her miniature cakes.
 Here is my cane attempt at the transfer bead that she made. I made it a square shape because I think it'll go well for the glass that I want to cover.
 I thought I'd show how I go about putting a cane together for this entry.
The first thing I do is usually sketch out what I want and then try to choose colours. You can see in the photo below that I've got my three colour choices and I've modified the orientation of the stripes in the leaves a bit to suit my tastes. I was aiming for something that was about 2 inches by 2 inches by 2 inches in dimension. That size seems to work well for me for reducing.
 I thought this would be a fairly straightforward cane, but I am so rotationally challenged that I had a hard time with the striped portion. I generated a lot of scrap with just the striped portion. I'm not too concerned about it, I can use the stripes for other things. But in the future I would likely draw out how I want the stripes to go and really plan that out. I didn't this time because I figured "how hard could it be?". Getting the stripes right was the hardest part of the whole thing.
I used a cookie cutter for the leaf cuts. This allowed some uniformity but it wasn't quite perfect. There is some size difference in the leaves that I wasn't aiming for, but ended up being OK.
 If you follow my blog at all you know that I hate packing canes. I tend to generate my background as a solid mass and then cut out the bits that I need to fill the cane with. It's a negative space approach and is somehow easier for me. It can be quite a bit cleaner and results in less distortion.
 Here I've got my blue and white background as solid masses. I've placed the leaf patterns on top of the background so that I can push them gently on the background. This leaves a bit of a mark on the background and shows me where to put the cookie cutter to cut through the background.
 Here's the cane once all the background has been cut away. You can see that there are very few cut marks in the background. I used the same cookie cutter to cut away the background that I used to assemble the leaf shapes.
 At this point I was quite happy with the cane. Start to finish to here is probably two hours and most of that was figuring out how to do the stripes.
I stopped the cane last night and then started with the background this morning. This meant that the background was softer than the leaf bits because the leaf bits had rested in a cool basement for 12 hours. I knew that the softness was going to be an issue, but I wasn't disciplined enough to wait and let all the clay reach the same consistency. So I started reducing right away. I did lose a fair bit on the ends. The top leaf didn't want to move and the background certainly moved easily. Even as I was starting to reduce I kept telling myself I should wait.
But, no different than having chocolate in the house, I just couldn't leave it alone. In the end the only real harm done was that I had generated some more scrap clay than usual when I reduce. And it's going to make a blue that I can use in other things.
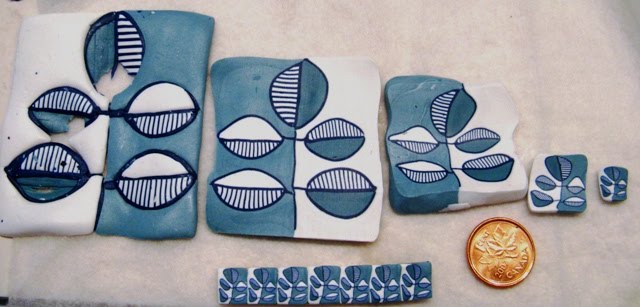
I'm quite happy with the cane and I have enough of it to do a few things with it. A friend of mine doesn't know it yet but she'll be receiving a bracelet. It actually came out like I wanted it to, and that's always a good thing. Even at quarter inch cane size the image is crisp and identifiable.
Once again I'm a week behind on my cane postings. I do have something that I'm working on, but I got sidetracked by this cane and the bracelets.
Cheers,
Sandy
3 comments:
This one is really nice. I love the pattern it creates in the very bottom of your last photo! I can see all kinds of variations with this.
I love your leaf cane version!! Thank you soo much for your words of my work :-)
Have a nice week!
hI ! I don't practise English since a long time, and I can't understand all the meaning ofyour text, but I love what you do !
And I would like to thank you for the several tutorials I find on your blog
Thank !
Eve
Post a Comment